In my absence from blogging I developed a new skill...
Nail Stamping!
My manicure game has gone to a whole new level.
Showing posts with label Nails. Show all posts
Saturday, June 20, 2015
Saturday, October 25, 2014
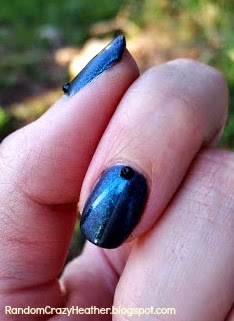
Opal Nails
October is my favorite month.
Not only is it beautiful, the weather is usually gorgeous, the leaves change color...
It's also the month of my birth, and the month I married my sweetheart!
October's birthstone is the Opal and it's my favorite gemstone. I'd rather look at a beautiful opal than diamonds. As a matter of fact, for my 10th wedding anniversary my husband asked if I wanted a big diamond ring and I told him truthfully that I wanted an opal ring! Since he spoils me rotten, he got me one!
In honor of this fabulous month and its fabulous birthstone, I did opal inspired nails.
This look was actually pretty labor intensive. I started out by dripping four different colors onto a plastic sandwich bag. I chose pastels: Blue (Sally Hansen Hard as Nails Xtreme Wear #481 Breezy Blue), Pink (Wet 'n' Wild Wild Shine #402 Tickled Pink), Green (Essence Color & Go #146 That's What I Mint!), and White to add depth (Pure Ice #1100 Pretty N' Patriotic.)
Then I folded the bag in half and smooshed the colors together. While that dried I painted my nails with my normal base coat, then one coat of OPI Nail Lacquer Happy Anniversary.
When the polish on the bag was dry I peeled it up and put large pieces over my nails like a whole-nail decal. I don't think it was completely dry because it got a little messy around my cuticles. Otherwise it worked great. I trimmed the edges off and used a metal file to clean it all up.
After I got the swirly part on I added one sparse coat of sparkles with Nails Inc. London Special Effects #164 Knightsbridge. I added this one to try to get the "fire" that you can sometimes see in opals.
I finished up with one more coat of Happy Anniversary to top it off and dull down the sparkles. I added the Sally Hansen Big Matte Top Coat to give it the same kind of finish as an actual opal.
I'm pleased with how these nails turned out. They don't really look a lot like opals, but I did some new techniques and the finished result is quite pretty. I liked this so much I think I might challenge myself to trying out a new look every month based on that month's birthstone!
Not only is it beautiful, the weather is usually gorgeous, the leaves change color...
It's also the month of my birth, and the month I married my sweetheart!
October's birthstone is the Opal and it's my favorite gemstone. I'd rather look at a beautiful opal than diamonds. As a matter of fact, for my 10th wedding anniversary my husband asked if I wanted a big diamond ring and I told him truthfully that I wanted an opal ring! Since he spoils me rotten, he got me one!
In honor of this fabulous month and its fabulous birthstone, I did opal inspired nails.
![]() |
| Sunlight |
![]() |
| Shade |
This look was actually pretty labor intensive. I started out by dripping four different colors onto a plastic sandwich bag. I chose pastels: Blue (Sally Hansen Hard as Nails Xtreme Wear #481 Breezy Blue), Pink (Wet 'n' Wild Wild Shine #402 Tickled Pink), Green (Essence Color & Go #146 That's What I Mint!), and White to add depth (Pure Ice #1100 Pretty N' Patriotic.)
Then I folded the bag in half and smooshed the colors together. While that dried I painted my nails with my normal base coat, then one coat of OPI Nail Lacquer Happy Anniversary.
![]() |
| Rorschach Test, I see nail polish! This is actually one of two I made. This one was too thin and you can see where it chipped right in the middle. |
When the polish on the bag was dry I peeled it up and put large pieces over my nails like a whole-nail decal. I don't think it was completely dry because it got a little messy around my cuticles. Otherwise it worked great. I trimmed the edges off and used a metal file to clean it all up.
After I got the swirly part on I added one sparse coat of sparkles with Nails Inc. London Special Effects #164 Knightsbridge. I added this one to try to get the "fire" that you can sometimes see in opals.
I finished up with one more coat of Happy Anniversary to top it off and dull down the sparkles. I added the Sally Hansen Big Matte Top Coat to give it the same kind of finish as an actual opal.
I'm pleased with how these nails turned out. They don't really look a lot like opals, but I did some new techniques and the finished result is quite pretty. I liked this so much I think I might challenge myself to trying out a new look every month based on that month's birthstone!
Labels:
Birthstone,
Nails
Friday, September 26, 2014
Abstract Autumn Nails
It's still really warm outside, but all anyone can talk about is Autumn.
Pumpkin Spice flavored everything is popping up everywhere. I'm not really a fan. Don't get me wrong, I like pumpkin pie for Thanksgiving dessert. That's just pretty much it for me.
The thing that does excite me is that the mountains are starting to change color. The fall leaves are absolutely one of my favorite things. That is the true sign of Fall.
Autumn is absolutely my favorite season. I was born in the Fall, so was my husband, and we were married in the Fall too. Those dates are all in October.
I love all of it. The cooler weather. The bulky sweaters. Wearing a hat and a scarf with just a jacket. Leggings and tights. Boots! Smelling wood smoke. Rainy days. Halloween. Thanksgiving. Football. There's just so much to love!!
In honor of the beginning of Fall I decided to do a subtle Autumn look.
I didn't want something that screamed "LEAVES AND PUMPKINS!!" I wanted something a little more understated. Since it's so hot, I just wanted a nod to the new season.
I had a really hard time getting the color to show up correctly in the pictures, so I painted some white paper and sent it through my scanner to try and show it properly.
The base is Color Club Mod in Manhattan, another one of the gifts from my friend Kristin. I'm pretty sure she got it in one of her Birch Boxes, but if you really like it you can probably find it on Ebay. I'm not really a fan. The color worked perfectly for what I wanted, but the formula was too thick and streaky. It was hard to deal with.
I taped off the square with nail accent tape and then painted on Color Club Put A Pin In It. Still really loving this one. It went on perfectly and looks gorgeous. It's also from Kristin and her Birch Box.
The final dots look black, but they're really a rich bronze brown. They also smell. That's because they're done in Revlon Parfumerie Autumn Spice. They don't smell bad. Just kind of... Autumn spicy.
They look a lot cooler in person than they do in these pictures, and I'm really pleased with how they turned out. Once the leaves really start changing I'm sure I'll have some more Fall looks, but for now this is perfect.
Pumpkin Spice flavored everything is popping up everywhere. I'm not really a fan. Don't get me wrong, I like pumpkin pie for Thanksgiving dessert. That's just pretty much it for me.
The thing that does excite me is that the mountains are starting to change color. The fall leaves are absolutely one of my favorite things. That is the true sign of Fall.
Autumn is absolutely my favorite season. I was born in the Fall, so was my husband, and we were married in the Fall too. Those dates are all in October.
I love all of it. The cooler weather. The bulky sweaters. Wearing a hat and a scarf with just a jacket. Leggings and tights. Boots! Smelling wood smoke. Rainy days. Halloween. Thanksgiving. Football. There's just so much to love!!
In honor of the beginning of Fall I decided to do a subtle Autumn look.
I had a really hard time getting the color to show up correctly in the pictures, so I painted some white paper and sent it through my scanner to try and show it properly.
![]() |
| It sort of worked. |
The base is Color Club Mod in Manhattan, another one of the gifts from my friend Kristin. I'm pretty sure she got it in one of her Birch Boxes, but if you really like it you can probably find it on Ebay. I'm not really a fan. The color worked perfectly for what I wanted, but the formula was too thick and streaky. It was hard to deal with.
![]() |
| Full sunlight and showing my thumb. |
I taped off the square with nail accent tape and then painted on Color Club Put A Pin In It. Still really loving this one. It went on perfectly and looks gorgeous. It's also from Kristin and her Birch Box.
The final dots look black, but they're really a rich bronze brown. They also smell. That's because they're done in Revlon Parfumerie Autumn Spice. They don't smell bad. Just kind of... Autumn spicy.
They look a lot cooler in person than they do in these pictures, and I'm really pleased with how they turned out. Once the leaves really start changing I'm sure I'll have some more Fall looks, but for now this is perfect.
Labels:
My Friends,
Nails
Friday, September 19, 2014
Cinderella Nails
I needed a little retail therapy to lift my spirits, and Ulta came through for me. I got a mailer from them with a $10 off card in it. No exceptions, it was basically a $10 gift certificate except that I had to spend it all.
I bought nail polish. Of course.
I splurged and spent the whole thing on one bottle. Actually, the polish was $11. Totally worth that extra buck! How could I resist that sparkle?! The polish is Nails, Inc. London Special Effects in Knightsbridge. (The anglophile in me just adores this!)
I named this look after the blue base color, Sinful Colors Professional 1106 Cinderella. It's a light blue with iridescent pink undertones. A very princess-y blue. I used OPI Natural Nail Strengthener as my base, did two coats of the blue, two coats of the glitter (only going half way) and followed up with one layer of OPI Top Coat.
I've been completely mesmerized by my nails. I love how the light catches the glitter and shows so many colors. I've already got some ideas for other looks using these polishes.
I've been doing my nails so much that I'm getting pretty good at doing my dominant right hand with my very not dominant left. This time my manicure looks just as good on my right hand as it does on my left! This pleases me greatly.
I finished this look yesterday and took pictures. Today I thought I'd have a little fun and painted a matte top coat on my right hand so I could compare and contrast the two looks. The shiny top coat on my left makes the look much more vibrant and sparkly, but the right has it's own interesting effect. I think it looks like Winter, snow and icicles. Muted glitter.
Which one is your favorite?
For the record, I redid the shiny top coat after I took these pictures. I'm just not in the mood for mismatched hands and I wanted the vibrant sparkle.
I bought nail polish. Of course.
I splurged and spent the whole thing on one bottle. Actually, the polish was $11. Totally worth that extra buck! How could I resist that sparkle?! The polish is Nails, Inc. London Special Effects in Knightsbridge. (The anglophile in me just adores this!)
I named this look after the blue base color, Sinful Colors Professional 1106 Cinderella. It's a light blue with iridescent pink undertones. A very princess-y blue. I used OPI Natural Nail Strengthener as my base, did two coats of the blue, two coats of the glitter (only going half way) and followed up with one layer of OPI Top Coat.
I've been completely mesmerized by my nails. I love how the light catches the glitter and shows so many colors. I've already got some ideas for other looks using these polishes.
I've been doing my nails so much that I'm getting pretty good at doing my dominant right hand with my very not dominant left. This time my manicure looks just as good on my right hand as it does on my left! This pleases me greatly.
I finished this look yesterday and took pictures. Today I thought I'd have a little fun and painted a matte top coat on my right hand so I could compare and contrast the two looks. The shiny top coat on my left makes the look much more vibrant and sparkly, but the right has it's own interesting effect. I think it looks like Winter, snow and icicles. Muted glitter.
![]() |
| Shiny on the left, matte on the right. |
Which one is your favorite?
For the record, I redid the shiny top coat after I took these pictures. I'm just not in the mood for mismatched hands and I wanted the vibrant sparkle.
Sunday, September 14, 2014
Indigo Glitter Nails
I've been feeling sick and I knew I wanted white tips with glitter, but I couldn't decide which glitter to use.
So I let Joey pick.
He chose blue glitter. Ulta Salon Formula Nail Lacquer in Indigo-Go Girl to be specific.
It's definitely not what I would have picked, but I think it looks interesting. I think I'm going to have to try this again with dark blue tips instead of the white.
White tips were done with a thick coat of Sally Hansen Insta-Dri in 120 Whirlwind White. I did two coats of the blue glitter and followed up with one layer of OPI Top Coat.
So I let Joey pick.
He chose blue glitter. Ulta Salon Formula Nail Lacquer in Indigo-Go Girl to be specific.
![]() |
| In direct sunlight. |
It's definitely not what I would have picked, but I think it looks interesting. I think I'm going to have to try this again with dark blue tips instead of the white.
![]() |
| Diffused sunlight. |
White tips were done with a thick coat of Sally Hansen Insta-Dri in 120 Whirlwind White. I did two coats of the blue glitter and followed up with one layer of OPI Top Coat.
![]() |
| At night with flash. |
Labels:
Nails
Friday, September 5, 2014
Sparks Fizzle Nails
The base color is Wet 'N' Wild FastDry in Silvivor. I like this polish a lot. it goes on nice and thick. Since I was putting a glitter over top, I just did one coat over my normal base coat.
The glitter is called Sparks Fly by Pure Ice.
It should be called Fizzled Out.
In the bottle it looks so much more interesting. A clear base full of tiny blue glitter with copper circles and large silver stars.
Unfortunately, no matter how much I shook it up I couldn't get the glitter to distribute at all.
I managed to get one star on my thumb.
I guess I should have expected this from a polish that only cost a dollar, but I was really hoping for more. The blue sparkle is kind of pretty, but the lighter glitters just fade away in the light base. I thought about trying again over a dark polish, but I don't think there's enough of the light glitter to make it worth it. I might give it a shot over a bright red, but I'm not sure.
I didn't bother to add a top coat. I'll probably be removing this tonight and doing something new.
Labels:
Nails
Saturday, August 23, 2014
Dark & Matte Nails
I follow a bunch of nail people on Facebook and this week's look is inspired by Colores de Carol.
The base color is a dark blue, Essence Color & Go 147 Miss Universe. It took three coats to get the color I wanted. I probably could have gotten away with just two, but I wanted a very dark base.
![]() |
| I got a little overzealous with the nail glue. |
The base color is a dark blue, Essence Color & Go 147 Miss Universe. It took three coats to get the color I wanted. I probably could have gotten away with just two, but I wanted a very dark base.
When the color dried I put some striping tape where I wanted and painted one coat of Sally Hansen Big Matte Top Coat.
![]() |
| My right hand turned out just as good as my left! |
Then I put a dot of Kiss Precision Nail Glue and added one of the nail jewels that I found super cheap on Amazon.
I don't have a lot of hope that the jewels are going to last all week, but they look pretty cool for now!
In other nail related news, I didn't start out with this look. I actually wanted to do red nails. The same day I bought this pretty dark blue I also got a red color that had beautiful a holographic.
Unfortunately this one turned out completely disappointing. It was more like a top coat, no color whatsoever.
| Pixel 233 Oh Golly Gee |
Very disappointing.
Labels:
Nails
Monday, August 18, 2014
Happy Nails
It's been a rough little while for me, so I decided to do something on my nails that I knew would make me happy. Kind of like Comfort Food but on my nails. Comfort Nails.
The polish is OPI Happy Anniversary. It's a sheer, sparkly, metallic white. It goes with everything, it's cheerful, and it's classy without being boring. Love this polish, it's easily one of my all-time favorites.
First I did white tips using Nalene tip guides and Sally Hansen Insta-Dri 120 Whirlwind White, because white tips make me happy.
Then I did two coats of Happy Anniversary. For some reason the white tip on my left index finger went wonky when I did the first coat. Instead of removing it all I decided to use a Nail Thins Ladybug decal to cover the little goober spot. I think it turned out extra cute that way. I didn't do a matching decal on the right hand. I think it looks adorable just having the one tiny bug!
I followed up with two coats of OPI Top Coat to protect things.
The polish is OPI Happy Anniversary. It's a sheer, sparkly, metallic white. It goes with everything, it's cheerful, and it's classy without being boring. Love this polish, it's easily one of my all-time favorites.
First I did white tips using Nalene tip guides and Sally Hansen Insta-Dri 120 Whirlwind White, because white tips make me happy.
Then I did two coats of Happy Anniversary. For some reason the white tip on my left index finger went wonky when I did the first coat. Instead of removing it all I decided to use a Nail Thins Ladybug decal to cover the little goober spot. I think it turned out extra cute that way. I didn't do a matching decal on the right hand. I think it looks adorable just having the one tiny bug!
I followed up with two coats of OPI Top Coat to protect things.
Labels:
Nails
Monday, August 4, 2014
Weeping Angels and Rainbows
I haven't been feeling very well the last few weeks. My depression is acting up, and I think I got some accidental gluten.
That doesn't mean I haven't kept busy! When I was feeling really down I somehow managed to convince my husband to go to the local yarn store, The Needlepoint Joint, and pick out some yarn for me. Reason #545 why my husband is the best, he hates yarn stores.
It worked! I was cheered up and I turned that yarn into a hat and mittens.
They're very soft and very cheerful. I haven't blocked anything yet, when I do the lacy pattern will show up better. I found the patterns on Ravelry, they're called the Cafe Au Lait Tam and the Cafe Au Lait Mittens (expanded from the Cafe Au Lait Mitts.)
I call them my Rainbow Tam and Rainbow Mittens. You can check here for the project page on my hat, and here for the mittens. I'm not 100% done with the mittens yet. I am going to knit a lining for them so that they're extra warm. I plan to use them for driving the kids to school on cold winter mornings.
I've also managed to do my nails. I trimmed them super short again, and wasn't up for being super creative. I decided to just swatch the Weeping Angel polish I got from A'dor Beauty Supply when I bought the other two polishes that I love.
This one didn't disappoint!!
It's got a grainy texture reminiscent of stone (just like a real Weeping Angel) in a pretty silver color. There are also some subtly iridescent flecks of glitter. Not nearly enough to be overwhelming, just enough to be fun! This is another polish I bought for my daughter but fell in love with!
Pictured is two coats (I probably could have gotten away with one, but two looks better) over my normal base coat. I didn't do a top coat because I didn't want to ruin the texture. It's been a few days since I polished them and so far I haven't had any chipping.
That doesn't mean I haven't kept busy! When I was feeling really down I somehow managed to convince my husband to go to the local yarn store, The Needlepoint Joint, and pick out some yarn for me. Reason #545 why my husband is the best, he hates yarn stores.
It worked! I was cheered up and I turned that yarn into a hat and mittens.
They're very soft and very cheerful. I haven't blocked anything yet, when I do the lacy pattern will show up better. I found the patterns on Ravelry, they're called the Cafe Au Lait Tam and the Cafe Au Lait Mittens (expanded from the Cafe Au Lait Mitts.)
I call them my Rainbow Tam and Rainbow Mittens. You can check here for the project page on my hat, and here for the mittens. I'm not 100% done with the mittens yet. I am going to knit a lining for them so that they're extra warm. I plan to use them for driving the kids to school on cold winter mornings.
I've also managed to do my nails. I trimmed them super short again, and wasn't up for being super creative. I decided to just swatch the Weeping Angel polish I got from A'dor Beauty Supply when I bought the other two polishes that I love.
This one didn't disappoint!!
![]() |
| I couldn't help but use my new hat as a background. |
It's got a grainy texture reminiscent of stone (just like a real Weeping Angel) in a pretty silver color. There are also some subtly iridescent flecks of glitter. Not nearly enough to be overwhelming, just enough to be fun! This is another polish I bought for my daughter but fell in love with!
Pictured is two coats (I probably could have gotten away with one, but two looks better) over my normal base coat. I didn't do a top coat because I didn't want to ruin the texture. It's been a few days since I polished them and so far I haven't had any chipping.
Labels:
Celiac Disease,
Depression,
Etsy,
Hand Warmers,
Hats,
Knitting,
My Struggle,
Nails,
Projects,
Random,
Sick
Tuesday, July 29, 2014
Ice Angel Nails
I let my 13 year old daughter design my nails this time.
Okay, actually I just told her she could pick out my polish. She took that and ran with it.
I did just what she wanted me to. Using my sticker guides I painted the tips with Sinful Colors 1106 Cinderella. It's a sheer blue (with just a bit of pretty pink sparkle) so I had to really glop it on. I had to go back over it in a couple of places. Luckily I knew it was going under other layers, so it didn't have to look pretty on its own.
The next layer was Hard Candy 804 Ice Pop. I daubed it on pretty thick. For the record, I bought this polish for Betty. It's fun looking, but not normally my style. At least it's blue.
For the final step in this design, I did the top half of my nail in A'dor Beauty Supplies Tears of an Angel. I did a lot of daubing with this one too. Still totally in love with this polish, but I think it's a little much with all the rest...
To finish the look I added my usual OPI Top Coat. I asked Betty if she wanted me to do the matte top coat, but she insisted on the gloss.
She also gave this look its name. Ice Pop + Tears of an Angel = Ice Angel. Pretty clever, don't you think?
Okay, actually I just told her she could pick out my polish. She took that and ran with it.
I did just what she wanted me to. Using my sticker guides I painted the tips with Sinful Colors 1106 Cinderella. It's a sheer blue (with just a bit of pretty pink sparkle) so I had to really glop it on. I had to go back over it in a couple of places. Luckily I knew it was going under other layers, so it didn't have to look pretty on its own.
The next layer was Hard Candy 804 Ice Pop. I daubed it on pretty thick. For the record, I bought this polish for Betty. It's fun looking, but not normally my style. At least it's blue.
For the final step in this design, I did the top half of my nail in A'dor Beauty Supplies Tears of an Angel. I did a lot of daubing with this one too. Still totally in love with this polish, but I think it's a little much with all the rest...
To finish the look I added my usual OPI Top Coat. I asked Betty if she wanted me to do the matte top coat, but she insisted on the gloss.
She also gave this look its name. Ice Pop + Tears of an Angel = Ice Angel. Pretty clever, don't you think?
Wednesday, July 23, 2014
One Coat Wonder
I was given this polish as a gift and it's my new favorite.
That is just one coat of Color Club Professional Nail Lacquer in Put a Pin In It. One coat over my normal base, no top coat or anything. This stuff is so cool. It went on nice and thick but it took a really long time to dry.
I am in love with this color. It's a very subtle metallic in a rosy, silvery, gold-ish color. It looks amazing with my skin tone. I've been looking for just this shade for months and it just fell into my lap! Thanks so much Kristin!!
Kristin (who is now my Hero) received it in a Birchbox, and that's the only place you can get this color. I've read that other bloggers have had trouble with this polish chipping, but so far I'm not seeing an issue.
If you're paying attention, you'll notice I'm hiding my thumb in those two pictures. That's because my thumbnail ripped off.
I honestly don't know how it happened. I was getting ready for bed and my thumb felt funny. I looked down and the nail was barely hanging on. I tried to clip it off, but I still managed to injure the side of my finger.
Can you see how red my thumb is? It is so sore! It's like a paper cut. I know I'm being a baby about it, but every time I touch something or grab something it hurts again.
Labels:
My Friends,
Nails,
Shopping
Thursday, July 17, 2014
Experimenting
I got a new polish in July's Ipsy bag and I decided to play around with it a little.
The polish is Models Own Red Sea - Splash. The Models Own website listed it as a top coat, so I decided to do white tips underneath so I could see what the Red Sea looks like on bare nails and over a white base. I used my curvy "V" tip guides, and in an attempt at doing an accent nail I painted my ring fingers all white (I used Pure Ice Pretty 'N Patriotic.)
I wasn't thrilled with how it turned out, it kind of reminded me of strawberry syrup. I decided since this was all about experimenting I'd use the Sally Hansen Big Matte Top Coat that I bought a few weeks ago but never tried.
That did the trick!! Putting the matte top coat on toned down the shine of the polish but the glittery bits still catch the light and sparkle! It turned out really cool looking. Unfortunately, it was even harder than usual to get a good picture.
The polish is Models Own Red Sea - Splash. The Models Own website listed it as a top coat, so I decided to do white tips underneath so I could see what the Red Sea looks like on bare nails and over a white base. I used my curvy "V" tip guides, and in an attempt at doing an accent nail I painted my ring fingers all white (I used Pure Ice Pretty 'N Patriotic.)
I wasn't thrilled with how it turned out, it kind of reminded me of strawberry syrup. I decided since this was all about experimenting I'd use the Sally Hansen Big Matte Top Coat that I bought a few weeks ago but never tried.
That did the trick!! Putting the matte top coat on toned down the shine of the polish but the glittery bits still catch the light and sparkle! It turned out really cool looking. Unfortunately, it was even harder than usual to get a good picture.
The polish was what I'd call a jelly. It looks more red on my natural nail and more fuchsia over the white base. One coat looked really streaky, but two covered nicely.
Now that I've discovered that matte top over glitter looks so cool I'm definitely going to have to try some other combinations! Models Own has an Aqua color with similar glitters that I might have to get too!
Saturday, July 12, 2014
Green Nails with Black and White Glitter
My daughter is really into black and white right now. It's her favorite "color". She loves it so much that when I saw Hard Candy's Black Tie Optional, I just knew I had to get it!!
I knew it would have the biggest impact over a bright color. Of course she wanted black or white, but I was able to convince her to go with a fun color.
She chose neon green!
I did two coats of the green, L.A. Colors Color Craze Mint and one coat of the Black Tie Optional. I think it turned out really cool!
I knew it would have the biggest impact over a bright color. Of course she wanted black or white, but I was able to convince her to go with a fun color.
She chose neon green!
I did two coats of the green, L.A. Colors Color Craze Mint and one coat of the Black Tie Optional. I think it turned out really cool!
Subscribe to:
Posts (Atom)


.jpg)

.jpg)
.jpg)